Dehyrated Tomatoes
Also called “sun-dried” tomatoes; almost no one lives in a climate that makes that the best method. According to the USDA, few, if any store-bought “sun dried” tomatoes are actually sun dried (but the regulations allow them to call them that!).
Ingredients
Tomatoes – any quantity, ripe, but not over ripe, still firm. The yield varies considerably depending upon the moisture content of the tomatoes, which depends upon the type of tomato and the weather. Paste tomatoes (Roma) work best and typically yield 2 cups of dried tomatoes for each 5 lbs of fresh.
Equipment
1 large pot and Large slotted spoon (if you want them peeled first)
Vacuum food sealer or plastic zipper (Ziploc) type bags
And one of the following:
An oven OR
a food dehydrator
Process – How to Make Sun Dried Tomatoes from Fresh Tomatoes
Step 1 – Selecting the tomatoes
Below are 4 common varieties that will work, although any variety (even grape and cherry tomatoes) will work, but they might take longer too dry, due to their higher water content:
Top left: Beefsteak
Bottom left: Roma, paste-type
Top right: Lemon Boy, yellow
Bottom right: Better Boy
The picture at right shows the best variety of tomato to use: Roma; also called paste tomatoes. They have fewer sides, thicker, meatier walls, and less water. And that means thicker sauce in less cooking time!
Also, you don’t want mushy, bruised or rotten tomatoes!
Step 2 – (Optional) Removing the tomato skins
If you do not want to remove the skins, skip to step 4. This is completely optional; some people prefer them with skins, some without. The type you buy in the stores usually has the skins intact.
Here’s a trick you may not know: put the tomatoes, a few at a time in a large pot of boiling water for no more than 1 minute (30 – 45 seconds is usually enough)
then….
Plunge them into a waiting bowl of ice water.
This makes the skins slide right off of the tomatoes!
With a gentle tug, the skins should practically slide off the tomatoes.
Step 3 – Removing bruises and tough parts, and cut in half
Cut the tomatoes in half lengthwise.
Cut out the tough part around the stem and any bruised or soft parts.
I usually then cut the tomatoes in half again, so I get four lengthwise quarters from each tomatoes. It just depends how big or small you want the final dried pieces to be. Usually they shrink to 1/4 their original size.
Step 4 – (Optional) – Remove the seeds
I generally don’t bother with Roma-type tomatoes, they have so few seeds, anyway. If I’m using regular Big Boy, beefstake tomatoes, then sometimes I do. Just scoop them out with a spoon or with a nudge from your finger!
Step 5 – Drying the tomatoes
As I said at the beginning, you have 3 choices:
A Food dehydrator – which is the easiest way, and since it is designed for this purpose, yields the most consistent results. I learned this through experience! Also, those with adjustable thermostats (temperature control and a timer are best – more expensive, but, as Borat might say “very nice!” See this page for food dehydrator makes and models and ordering information.
An oven – everyone has one of these, so that means you need no additional equipment
Regardless of the drying method you use, you spread the tomato slice out on their trays and you may opt to sprinkle them with salt or dried herbs (basil, thyme and/or oregano are commonly used).
Here are the specific directions for each method:
Food dehydrator: Arrange the pieces on each rack so that air can circulate, preferably with the pieces not touching each other, but there’s no need to become obsessive about it. Some people prefer to sprinkle the tomatoes with sea salt, kosher salt and/or some spices (typically basil). Turn the dehydrator on and enjoy the aroma. If your food drier has a thermostat, set it for 140 degrees F. It will take 3 to 8 hours. See “how to tell when they are done” in step 6, below.
Oven: preheat the oven to 150 degrees F (65 degrees C or gas mark 1). If you don’t have these settings, just use the lowest setting you’ve got. Arrange the tomatoes on cake racks, spread out, not touching each other. Cookie sheets will work if you don’t have cake racks or screens – but you need to flip or stir the tomatoes once in a while to expose the other side of them. Some people prefer to sprinkle the tomatoes with sea salt, kosher salt and/or some spices (typically basil). Close the oven. It takes about 10 to 20 hours, but you’ll need to check periodically, including rotating the shelves and moving them up or down to get even heating. If you want to speed it up, you can bump the heat up to as high as 200 degrees F ( 93 degrees C), but you’ll need to watch them much more closely. See “how to tell when they are done” in step 6, below.
Step 6 – How to tell when they’re done
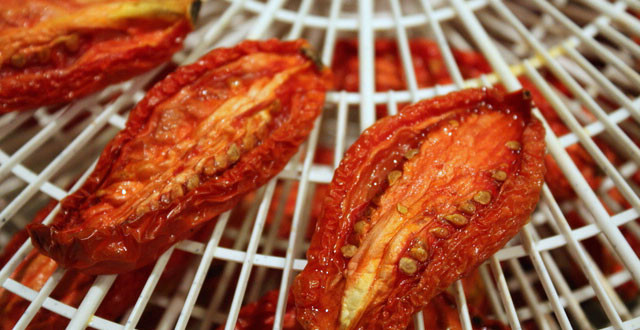
The amount of time it takes depends on the water content of the tomatoes, the thickness of the slices, and how well the air is able to circulate around them. When done, the tomatoes should be flexible, like a raisin from a fresh bag; not brittle. Most describe them as leathery with a deep red color, without free water or a tacky feeling.
Step 7 – Cool, then Fill the Zipper-type bags
Let the tomatoes cool to room temperature (about 20 to 30 minutes), then fill the bags. Don’t overfill the bags, leave a little room for expansion. Do try to avoid leaving any air pockets! A vacuum bag is shown at left, but you can use ziploc (or similar) bags, shown below. But be sure to squeeze out the extra air (below left is before, below right is after squeezing out the excess air).
Step 8 – Vacuum seal the bags (if you have a vacuum sealer)
Obviously if you haven’t got a vacuum food sealer, just inspect the bags and you may need to open them and reseal them to eliminate any air pockets! But the rate of spoilage and preservation of flavor is MUCH better with the vacuum-sealed tomatoes. TIP: If you don’t own a vacuum food sealer to freeze foods, place food in a Ziploc bags, zip the top shut but leave enough space to insert the tip of a soda straw. When straw is in place, remove air by sucking the air out. To remove straw, press straw closed where inserted and finish pressing the bag closed as you remove straw.
Step 9 – Store the bags in the fridge or very cool, dry place
The freezer is best, there the dried tomatoes will retain their color and flavor for about 9 to 12 months. A fridge is ok for a few weeks, but if there is much moisture left in them, they WILL start to get moldy in a month or so. The vacuum bag food sealers really help to increase the longevity of dried tomatoes in the fridge (see this page for more information) with their vacuum sealing! I am not paid by them, but these things really work.
Dried tomatoes quickly reabsorb moisture, so be sure your containers really are airtight. If they re-absorb moisture, they may then go moldy. If they are still too moist, they will also go moldy.
Check the newly packaged dried tomatoes daily for about a week to make sure there isn’t any condensation in the containers. If you see any moisture in the containers, remove the tomatoes immediately, put them back in the food dryer and resume the drying process.
Notes about packing in oils:
If you like to have your dried tomatoes in a seasoned oil, such as olive oil with basil, thyme, oregano and/or minced or powdered garlic or garlic salt, it is best to do this when you are ready to eat them, or shortly before, and refrigerate them. There aren’t many university studies about the safety of home-dried tomatoes packed in oil, but the information that’s available suggests that it is best to just do that as you use them or make up small batches and refrigerate them.


