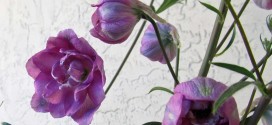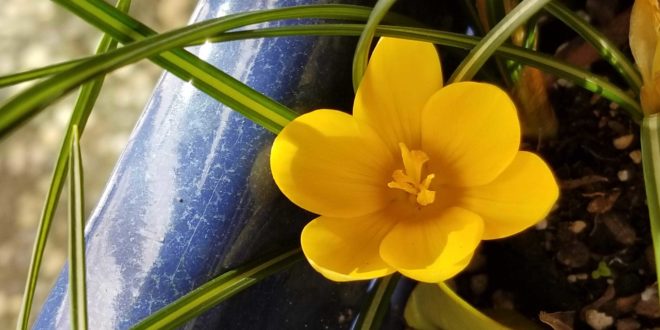

This variety is one of the familiar, and welcome, giant spring Crocus, which are colorful companions for early Daffodils. They are terrific for bedding, rock gardens, shrub borders, and naturalizing in grass. Reserve a few bulbs to pot up and force, and you will soon be the bearer of sweet little gifts that are inexpensive yet rich with the promise of winter’s end.
Pronunciation: krow’-kus
First bloom: Feb 2019
Nursery: Yamagami Nursery in Cupertino
Bulb size: Species 5-6 cm/Hybrids: 6-12 cm
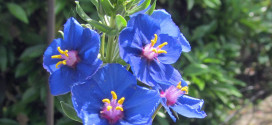
There are 2 types of spring-blooming Crocuses—the species and the hybrids, which are generally listed as selections of C. vernus. The former are notable for their unusual coloration, the latter for their large flowers. Species Crocuses generally bloom earlier than the hybrids, so by using both kinds, you prolong the season. The bulbs (properly, corms) multiply rapidly and can be planted anywhere a dash of early color is wanted.
Planting: Bulbs are easy to plant. With a trowel or a bulb planter, dig a hole to the depth indicated on the plant label (about 3–5″ deep; use the label, which is 6″ long, as a rough measuring stick). Set the bulb in the hole with the flat side down and pointed end up. After you’ve placed the bulb in the hole, fill the hole with soil and water thoroughly.
Light/Watering: Most bulbs flower best in full sun (6 hours or more of direct sunlight per day) but tolerate light shade. They can thrive under deciduous trees, provided root competition is not too severe and the bulbs receive at least a half-day (3–4 hours) of sunlight after the trees leaf out.
Although there may be no signs of life above ground, bulbs begin sending out roots soon after planting—as long as the soil is sufficiently moist. Unless you expect a soaking rain within a day or two of planting, we recommend that you water thoroughly after you plant. Water newly planted bulbs again only if rainfall is scarce. Once established, most bulbs want ample moisture—½ to 1″ of rain per week—while in active growth (which begins in fall, slows or stops in winter, and resumes in late winter or early spring) and require soil that is on the dry side during summer dormancy. Do not plant bulbs near soaker hoses or sprinklers.
Fertilizer/Soil and pH: Crocus bulbs require soil that drains well the year round. To improve the drainage of heavy soil, dig in organic matter such as compost, aged manure, leafmold, peat moss, or (in the South) shredded pine bark. If you garden in very heavy clay, consider constructing raised beds to provide well-drained conditions. Crocuses tolerate acid soil but thrive in neutral to slightly alkaline soil.
The best time to fertilize bulbs is in fall, when they are sending out new roots. The next best time to fertilize is in early spring, just as the foliage begins to push through the soil. We recommend using a slow-release fertilizer formulated especially for bulbs, such as a granular Daffodil fertilizer. It’s an easy matter to apply the fertilizer to the surface of the soil above the bulbs after planting and then every fall thereafter. We do not recommend using bone meal. It contains only one primary nutrient (phosphorus) and attracts dogs and rodents, which may dig up the bulbs.
Bloom Time: In our Sunnyvale garden (USDA Zone 9), the snow crocus start Feb 1 and the hybrid crocus two weeks later.
Dormancy: Most of the bulbs we offer go dormant within about 8–12 weeks after flowering. The period between the end of flowering and the withering of the foliage is crucial to the future vigor of the plant. If you cut, fold, or braid the leaves before they have yellowed and collapsed, you may prevent the bulb from storing the energy required to bloom the following year. You can hide curing foliage by interplanting bulbs with leafy perennials or with annuals or ground covers. If you plant bulbs in a lawn, do not mow the grass until the bulb foliage begins to yellow.
Transplanting/Dividing: The best time to move or divide bulbs is when their foliage has all but withered, signaling the end of active growth. Lift them with a digging fork or a spade, taking care to avoid injuring the bulbs, and replant them immediately at the same depth and about 3 times their diameter apart.
Pests/Diseases: Bulbs as a group are not much troubled by insects or diseases, but in some areas, rodents or deer may eat the bulbs, foliage, or flowers.
Forcing Cold-Hardy Bulbs: Many spring-flowering bulbs can be tricked or “forced” to bloom indoors in winter, providing color and fragrance when few plants are stirring outdoors. “Rooting time” refers to the amount of time during which cold-hardy bulbs must be kept cold (about 40°F) and moist before they can be brought into bloom.
Containers and potting mix. You can use any pot you like to hold bulbs for forcing, as long as it allows room for root growth—about 3–4″ of space below the bulbs. If you choose a pot without a drainage hole in the bottom, you’ll have to water your bulbs very carefully; bulbs sitting in soggy potting mix soon rot. We recommend that you force bulbs in a soilless potting mix (available at garden centers and hardware stores). A soilless mix holds moisture but allows excess water to drain away readily.
Potting the bulbs. To pot the bulbs, begin by placing potting mix in a plastic tub or bucket. Slowly add water and stir until the mix is moist but not soggy. Add moistened mix to the container until the container is about ½ full. Set the bulbs with the flat side down on top of the mix. Space the bulbs much more closely than you would in the garden; they should almost touch. Then add more mix to cover the bulbs. Cover the bulbs up to their necks, leaving the tips of the bulbs exposed. Water thoroughly after potting.
Chilling the bulbs. To force cold-hardy bulbs into bloom, you must first encourage them to produce new roots by keeping them cold and moist for a period of time that varies by type of bulb (8–10 weeks for Crocus). The ideal rooting temperature also varies, but most bulbs flower best if stored at 40–60°F for the first 3–4 weeks after potting, then at 32–40°F for the balance of the cooling period—a shift that mimics the drop in soil temperature outdoors as fall turns to winter.
You can also chill bulbs in a cold basement, an unheated garage (provided the temperature doesn’t fall below freezing), or a refrigerator. In such locations, it may be difficult to arrange for the shift in temperature described above, but most bulbs will root properly if the temperature does not stray too far above or below 40°F during the rooting time.
If rodents have access to your bulbs, they may devour them, so protect potted bulbs with steel mesh or another barrier that still allows air circulation.
Please note that moisture is as important as temperature in the successful chilling of bulbs. Check the potting mix in the pots every few weeks and water thoroughly when the surface of the mix is dry to the touch.
Toward the end of the recommended rooting time, begin checking the pots for signs that the bulbs have rooted. If you see fleshy white roots poking through the drainage holes in the bottom of the pots, the bulbs are usually ready to bloom. If you don’t see roots, give the bulbs more time in cold storage. Don’t judge readiness by the appearance of shoots from the tops of the bulbs; without roots, the bulbs won’t flower properly.
Once the bulbs have rooted, you don’t have to bring them out of the cold immediately. Most tolerate extra chilling time, allowing you to orchestrate a succession of winter bloom.
Bringing the bulbs into bloom. When the bulbs have rooted, bring the pots out of cold storage and set them in a bright window in a cool room (one where the temperature stays below 65°F). Bright light will help keep the leaves and flower stems compact; in weak light, they tend to flop. You are likely to find that the bulbs have produced white shoots during cold storage. Sunlight quickly turns them green.
Keep a close eye on the moisture needs of the bulbs as they send up leaves and flower stems. Initially, the bulbs probably won’t need to be watered more often than once a week (if that much), but by the time they bloom, you may need to water them every day or two.
Most bulbs will bloom 2–5 weeks after they come out of the cold, heralding spring with their bright colors and sweet fragrances. Duration of bloom varies with the type of bulb and the variety but is generally shorter than you’d expect of bulbs in the garden. Warm temperatures and low humidity indoors speed the decline of the flowers. Keeping the pots out of direct sunlight and moving them to a cool room at night helps prolong bloom.
When the blooms fade, we recommend that you toss the bulbs on the compost pile. If you keep them in a sunny window and continue to water them, forced bulbs can be planted in the garden after the threat of hard frost has passed, but they won’t bloom well again for at least 2 years. It’s better, in our view, simply to buy enough bulbs for planting indoors and out.