
Cold-hardy and resilient, kale is an easy member of the cabbage family to grow. You can set out plants quite early in spring as long as you protect the young plants from severe cold winds with a cover. They will grow steadily for months until the weather gets too warm. You’ll get a second chance to plant kale in the fall, when cool weather brings out a wonderfully sweet, nutty flavor that is unique to these cold-natured plants. Fall is the best time for growing kale in Sunnyvale (USDA Zone 8-9), because the leaves are sweeter when they mature in cooler weather. In the kitchen, kale can be steamed, stir-fried, or substituted for spinach in omelets, casseroles, or even quesadillas. It’s a wonderful addition to smoothies, too, and tender young leaves make delicious salads.
- Plant kale 3 to 5 weeks before the last frost. In-ground gardens, raised beds, and containers are all excellent growing options.
- Space kale 18 to 24 inches apart in an area with full sun and well-drained, fertile soil with a pH of 6.5 to 6.8.
- Improve native soil by mixing in several inches of aged compost or other rich organic matter.
- Kale is a fast grower, so keep the soil moist by giving it 1 to 1.5 inches of water each week.
- Get the most out of your harvest by regularly feeding plants with a continuous-release plant food.
- For nutritious kale year-round, consider an indoor, water-based growing system.
- Harvest kale starting with the lowermost leaves once they reach the ideal color and are large enough to eat. Leaves reach their peak flavor once they’ve been kissed by a light frost.
Soil, Planting, and Care
Set out plants in spring 3 to 5 weeks before the last frost; in late summer, you can begin planting kale 6 to 8 weeks before the first frost for fall and winter harvests, and continue planting throughout the fall in zones 8, 9, and 10.
Kale grows best in full sun, but will tolerate partial shade as well. Plants that receive fewer than 6 hours of sun daily will not be as stocky or leafy as those that get ample sun, but they will still be plenty edible! Like collards, kale likes fertile soil to grow fast and produce tender leaves. Enrich the soil with compost and fertilizer before setting out the seedlings. Apply fertilizer and lime according to test recommendations. If you forgo the soil test, work nitrogen-rich amendments such as blood meal, cottonseed meal, or composted manure into the ground before planting.
The soil pH should be 6.5 to 6.8 to discourage clubroot disease, although the plants will grow fine in a pH of 6.2 to 6.8 if clubroot is not a problem in your garden. To be sure about your soil pH, test the soil with a do-it-yourself kit, or by using your regional Cooperative Extension office. If that seems too complicated, you can simply improve your existing soil by mixing in a few inches of Miracle-Gro® Performance Organics® All Purpose In-Ground Soil with the top layer. Enriched with aged compost, it will improve both the texture and nutrition of the native soil.
Kale is easy to plant, and grows beautifully in both raised beds and containers. To create the ideal growing environment for the plant roots, fill raised beds with Container Mix. Set plants at the depth at which they are growing in the container. Space them 18 to 24 inches apart. The leaves will grow bigger if given a lot of space, but smaller leaves tend to be the most tender. After planting, water plants well. Plants grow best when they have access to both great soil and a continuous source of nutrition, so apply a water-soluble fertilizer regularly for excellent results.
At this point you may need to be patient, because spring-planted kale may stay small until slightly warmer soil temperatures trigger vigorous growth. Kale planted in late summer or early fall may sulk through spells of hot weather. Then, when conditions improve, the plants will take off, quickly multiplying in size.
Kale likes a nice, even supply of water, about 1 to 1.5 inches per week. You can measure how much water rain has provided by using a rain gauge in the garden. Mulch with compost, finely ground leaves, weed-free hay, straw, pine needles, or finely ground bark to keep the soil cool and moist and to keep down weeds. Mulching will also help keep the leaves free of splashing soil for a clean harvest.
You also have the option of growing kale indoors. An easy way to do that is in a hydroponic growing system. There’s no soil—plants grow directly in water that circulates around the roots, delivering moisture, nutrition, and air. With plenty of light courtesy of a grow light, the system provides top-notch growing conditions for kale. Best of all, you won’t even have to go outside to harvest.
Troubleshooting
Kale often grows as a carefree crop, but there are several insects that like kale as much as people do. Velvety green cabbageworms often can be found chewing holes in kale leaves. The larvae of cabbage white butterflies, cabbageworms are more likely to feed on cabbage, broccoli, and cauliflower than to bother your kale.
Colorful black-and-orange harlequin bugs often show up on kale plants that are feeling the stresses of old age. Rather than fight the harlequins, most gardeners pull up and compost old plants if it is mid- to late summer. In late summer, the best way to protect young seedlings from these and other pests (like grasshoppers) is to cover them with a row cover or some other lightweight fabric, such as wedding net (tulle). The covers can be removed in mid-fall when pest populations usually drop dramatically.
Watch for outbreaks of gray-green cabbage aphids, which often gather in clusters within the folds of frilly kale leaves. Treat small problems with insecticidal soap. Pick off and discard badly infested leaves.
Harvest and Storage
Like collards, kale leaves are sweetest in the fall, after they’ve been touched by a light frost. Pick the oldest leaves from the lowest section of the plants, discarding those that appear yellowed or ragged. Pick your way up the stalk, taking as many leaves as you like, as long as you leave at least 4 leaves intact at each plant’s top (or growing crown). Kale will produce new leaves all winter in zones 7 to 10. Overwintered plants will eventually bolt (producing yellow flowers) in spring, signaling that it’s time to remove them and make room for other crops. Wash the leaves thoroughly and store them in a plastic bag. You can eat the stems or discard them—it’s up to you. If you cook the kale, the stems will become more tender. Kale leaves will keep for several days in the fridge in a loose plastic produce bag.
- Kale being watered in the garden. Kale needs lots of water to make tender leaves.
- Kale will produce the most tender leaves if the plants get plenty of moisture from the beginning.
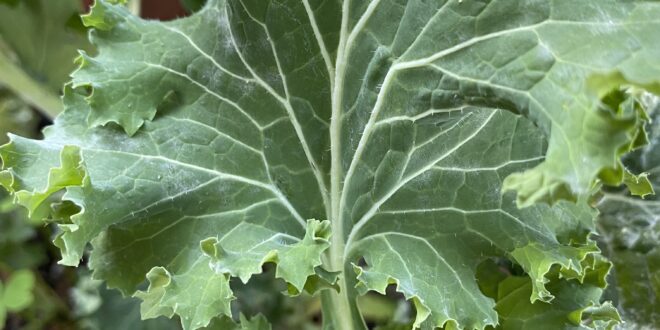
- Kale plants grow large with frilly leaves in the garden
- Full-sized kale plants are beautiful with big, frilly leaves that can be eaten whole in sandwiches, cut into salads, used as a garnish, or cooked alone or in soups.
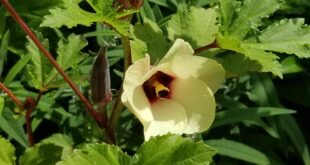
- Large pots of kale plants flower in warm weather in the garden
- When the weather warms, your kale plants will send up flower stalks and produce pretty yellow flowers. The plants become ornamental in the garden, and you can cut the flowers for arrangements.